In previous blogposts, we started working with YAML Pipelines in Azure DevOps. After a while, you will probably find yourself copy and pasting the same steps for different projects. This makes it hard to reach consistency if you use CICD for your ARM templates in a company. And even if you don’t, copying the same code takes time and can get messy real quick. It’s a good thing that Azure DevOps job and step Templates are available.
The documentation about templates is pretty good and I recommend you read it. For this post, I want to show you how to put it to practice with an example.
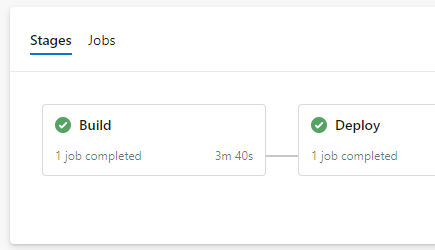
The goal
The YAML pipeline I made in this post, has a pretty basic structure to use with ARM templates.
I want to go through those in two different ways. In this post, we will focus on recreating these tasks in a step template in the local repository. In Part two, we use a job template in a different repository. The step templates we create in this post are very useful if you have multiple resources that use the same task, or if you want to use the same task on multiple agents.
While these tasks are pretty specific, I hope it makes the process of transitioning to a template clear. To tag along, you can find the YAML file I’m going to recreate with templates here on Github.
Choose the tasks
For this example I want to focus on the tasks in the build. In summary, they do the following things:
– Validate the template in Azure
– Install the ARMHelper Module
– Check if no resources are removed or overwritten
– Show the resources that would be deployed
At the example, these steps have become a bit messy because more than one template is deployed, which might happen more often in your environment. Also, the installation of the module is inside the first task. Readability would improve if it was used separately. So let’s try to create a template for YAML to fix this. I will walk you through the steps.
Install the ARMHelper Module
The YAML for this task isn’t too complicated if we would put it in a separate step. What is important, is that this is the only step that we only use once. So instead of making a template, let’s put it directly into the YAML pipeline. So paste the following code in the original pipeline.
Create the template file
The other steps are really great to use a template for. What we can do, is create the template and use the resource group and template-folder as parameters.
Let’s start with the template. Create a file in the root of the repository and call it something descriptive. I use ARMBuildTemplate.yml
Add the tasks
The base of this file are the tasks like you have used them in the pipeline. So copy the three tasks ( AzureResourceGroupDeployment, Test existing resources and Show deployed resources) to the new file.
A few changes you should make:
– Remove the install steps that are now moved to the separate step before this one
– Remove the second instant of the Test-ARMDeploymentResource and Test-ARMExistingResource cmdlets
– Delete one instant of the validate AzureResourcegroupdeployment step
– Make sure all indentation at the beginning of the lines starts at – tasks
– Add “steps:” at the beginning
So now you should have this:
Add parameters
You could leave it there, this is a working template. But it lacks the flexibility we want to make this template reusable.
In this case, I’m aiming for a flexible folder for the deployment files and a flexible resource group.
At the start of the template, add those two as parameters:
parameters:

resourceGroup: ' '

deploymentFolder: ' '
(The indentation for this example is wrong. Please check the Github Gist below for the correct indentation)
In the task, replace all instances of those two with
${{ parameters.resourceGroup }} or ${{ parameters.deploymentFolder }}
I have also used those parameters in the displayname of the tasks to make the build output more clear.
The end result is the below file:
Integrate into the existing pipeline
Now to integrate it into the existing pipeline. Let’s remove the two steps we have covered in the template. We change them into the following lines:
And that’s it! With this set up it would be a lot easier to add extra resources to this repository. If you run the deployment, it will run as if the templates content was in the pipeline.
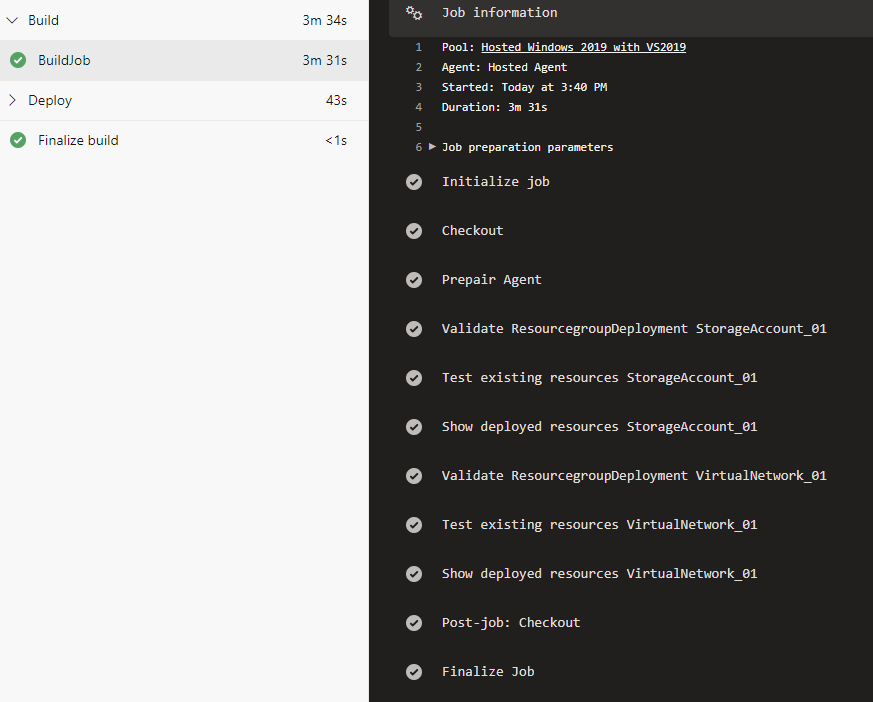
The relevant part of the new pipeline is shown below, the complete pipeline and repository structure can be found in my Github.
Don’t forget to be careful with indentation and capital letters, they matter in YAML.
This post shows how you start using Azure DevOps job and step Templates. Find part two here, where we will take this a step further and create a separate repositories with reusable job templates.
Pingback:Azure DevOps Pipelines Tune Up: Templates and Centralization