With Azure DevOps, we get provided with agents to run our CICD pipelines on. This is really great, as it makes it so much easier to get started without to much investment. Also we get different kind of OS’es to use.
You also have the option to use your own systems as agents. In this post, we will walk through the reason you would want that and after that I’ll show you how to deploy Azure DevOps agents through a pipeline.
But why?
why would you use your own agents? There are a few advantages to consider.
Control
You create your own VM with your own resources, version, updates and specs. This means you get all control on all those aspects. If you need to perform tests against a specific version of your software, you will be sure nothing is changed. I have had a pipeline fail because of an update in the images of the Microsoft provided pool (although this has happened only once).
More control does come with a downside though: You will have to perform all your own maintenance.
Speed
Not only do you get to choose your own specs for whatever agent you use, you also get to install your own software.
In a lot of the pipelines you see on my blog, I install a module. this needs to be done every time I run the pipeline. The problem that comes with this is that it takes time. If you run a lab, that is not that big a problem. But in production time is money. Quite literally if you cross the 1800 free minutes you get in a month. Because you can keep track of the amount of agents you need, the software installed and the resources, you can make the workflow faster.
Local sources
By creating an agent on a domain-joined server, you get the possibility to interact with your local environment. So you could deploy an app, or copy PowerShell scripts that you might use to a server. Now you have the benefit of source control and auditing while still being on-premises or server based.
Creating a local agent
So how do you do it? My initial plan for this post was to create a nice step-by-step guide on creating an agent. But as it turned out, I could copy and paste the Microsoft Docs, because they are extremely well written. Instead of doing that, I will refer you to the guide provided by the Docs. I recommend you actually install an agent that way so you see what’s going on, before moving on.
Create an agent through an agent
To take it a bit further, I want to consider automation. It is possible to create an unattended installation.. So it should also be possible to manage the agents in a pipeline right?
Challenge accepted
I have created some ARM Templates, PowerShell scripts and a pipeline that creates an amount of agents to your liking. This pipelines deploys (Windows) VMs and adds them to the agent pool. You can of course add tasks to add software as needed. As my goal is to create fresh and clean VMs to use as agents, the mode is set to complete and all resources are removed before they are deployed again.
Note: for production, you will probably want to add software or modules to the agents. Visual Studio for example.You can choose to install these through scripting, or work with a custom image in Azure. In this post, the VMs have no customization except for the agent installation.
Prerequisites
To use this method, there are some prerequisites:
- The agent pool should be created in advanced in the portal. Read how to here.
- A PAT key with the right permissions should be generated.
- The VM should have internet access to download the installation files. You can remove this later if you want.
- I have disabled the step where a resource group is deleted. This is for security reasons. Do NOT use a resourcegroup with existing resources that you do not want to delete. If you are sure about your resource group, you can remove the line “enabled: false”
Create your own pipeline
You can find all the scripts on my Github.
Clone or copy that repo to your own GitHub or Azure DevOps organization.
The trigger is set to master, so it will not run if you don’t start in master. You can of course change this if you want to. To find out more about basic YAML pipeline management, see my blogpost on that.
The first thing you need to do is change the parameters. For the ARM templates, you can change them in the repository itself, the file azuredeploy.parameters.json. You should also change the parameters at the top of the file azure-pipelines.yml to your situation. Take care of choosing a non-existing resource group or one that can be cleared. Remove the line “enabled: false” from the delete-task if you are sure
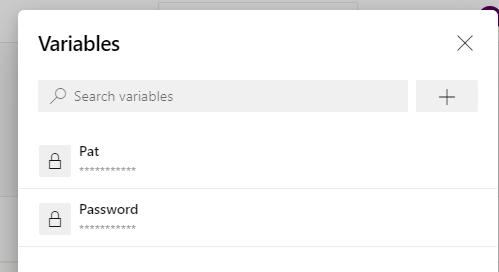
You are now almost ready, you just need to create two secure variables in the Azure DevOps web interface. Open the pipeline and click variables.

Create the following variables:
- Password :the admin password for the machines
- Pat: a PAT key for an Azure DevOps account that is allowed to manage the Agent pool
Check “keep this variable secret” for security.
What the pipeline does
I’ll walk through all the tasks in the pipeline
Stage 1: Build
This stage will validate the ARM template.
Stage 2: Deploy
Delete Existing Resource Group
Although the mode is set to complete, it will not delete existing resources if they are in the template. It is however my goal to create fresh new resources, so the first step is to delete the Resource Group.
(you can remove this step and make the deployment incremental, but the custom script extension is not working that well when deployed to an existing VM)
Deploy New Azure Resources
The resources for the agents are deployed in this step through an ARM template. Also, the VMs are enabled for WinRM, so the files in the next step can be copied. A storage account is created to make it possible to copy the installation files. If you have one available already, it is possible to remove this from the template.
Note: This step leaves an error in the pipeline for some reason. It doesn’t influence the deployment and doesn’t fail the pipeline, so I will look for a fix at a later time. If you know what causes it, let me know!
Copy installation files
The files that are located in the installationfiles folder are copied to the VMs. This is basically a PowerShell script that is ran in the next step. The files will be placed in a folder called C:\temp.
Deploy Custom Script Extension
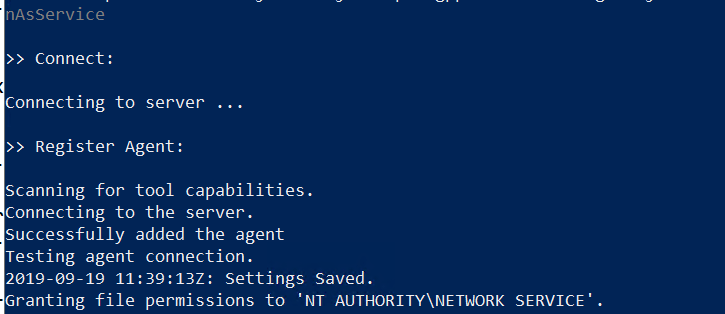
This is an Azure PowerShell task that places a custom script extension on each VM. To do this, it will first remove the existing extension. After that, the new extension will call on the script that was place in C:\temp in the previous step. That script (Install-Agent.ps1) takes care of the Agent installation. As it runs locally, that script could also be used to provide the servers with other features, like certain Windows features or PowerShell modules. The installation files are downloaded from the Github Repository, as you would need to login in Azure DevOps to download it there.
Result
In the end the agents will be placed in the pool.
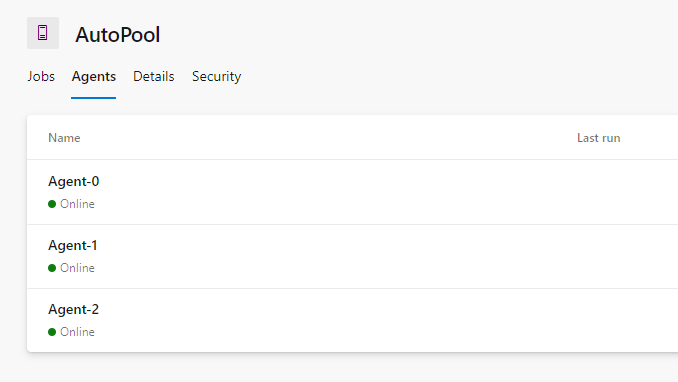
You can now use the agent by defining it in the YAML pipeline
Pool:

Autopool
If you have any questions, don’t hesitate to leave them in the comments.


