So you have been working with PowerShell. You hear a lot of people around you talking about GIT and you want to get into the game. But there are so many possibilities, you have no clue where to start. You’re not a Dev, you just write small scripts every now and then. Last year, I wrote this blogpost to help you get started with using Git for PowerShell scripts. After you have been using GIT like that for a while, it is a good idea to move on the the next stage. This is part 2, start using GIT for PowerShell: Branches and pull requests.
The goal
There are already a lot of amazing guides on using GIT out there. But when I was learning about GIT myself, I found myself overwhelmed by all the information, possibilities and different options. That is why this guide is is basic and practical. I’ll show you how to create a branch and after that create a pull request to merge it back to master. I will leave out a lot of the possibilities and the why’s. I encourage you to go search for this information yourself, but my goal here is to give you the tools to start using branches straight away.
If you are completely new to GIT, please start with reading my previous blog post.
In this post we will be using the same software as before:
- Git: https://git-scm.com/download/win
- Visual studio Code with the PowerShell extension installed: https://code.visualstudio.com/
I will use GitHub for the examples. The process in GitLab, Azure DevOps and other providers is a lot alike.
Branches and Pull requests
If you have been using GIT like in my previous guide, you have pushed all your scripts to the default branch of the repository, which is called the Master branch. Maybe you have heard the phrase “Don’t push to master” before. To find out what is meant by that, let’s consider what we are talking about.
The process
This is a very basic overview of the process we are going to follow. I will explain the different parts after the picture.
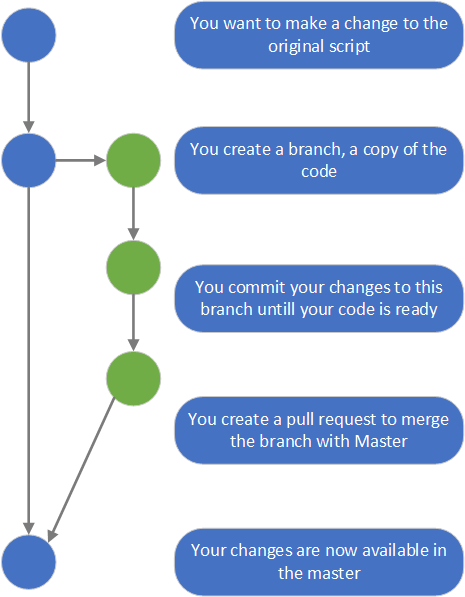
What is a branch?
You have a repository which contains your scripts. When you create a branch, you get sort of a copy of all these scripts. This means you can work on these scripts and make changes, but the original scripts (the master branch) remains untouched. When you are ready with your changes, you can merge your new branch with the original one, so your new changes are added to the master branch.
What is a pull request/Merge request
Note: in GitHub and Azure DevOps, this is called a pull request. In GitLab, it is called a merge request. I will refer to it as a pull request in this post.
When you want to merge two branches into one, you do that by creating a pull request.
In a pull request, you create a comparison between the new branch and the branch you want to merge with. GIT creates an overview of the differences between the two. A pull request is also a place where you do automatic testing, or to let other developers review your work.
But why?
So why would should you care about branches? It gives some version control, but you already had that when you were just pushing to master. In my experience, there are two very important reasons to use branches.
Master -eq Production
There is a good practice, although I would rather call it a must, when working in a production environment: The scripts that are in the master branch are confirmed to be working and ready for deployment. This saves time with testing and gives you something you can rely on.
If you only have the master branch, you could only commit changes when you are certain the changes do what you want to do. With extensive scripts, it could easily take multiple days or weeks to reach that point. All this time you cannot commit your code and do not have the benefit of using GIT for your backups and version control. So that is where branches come in to place. You can write your code in a branch, commit while it is not ready and if it is done, you create a pull request to bring it back to master
Note: While we will focus on the relation between a branch and the master for simplicity, you can create pull requests between other branches as well.
Working together
If you want to keep improving your scripts while they run, you want to work with others. By combining knowledge and time, you can remove single point of failures and achieve the greatest code quality.
But let’s say you are not using branches. You might be working on one part of the script, while your colleague is working on something else. Sooner or later you will get in each others way, or your changes might even overlap. And how about you commit a work in process and your colleague starts working on your code that wasn’t finished yet. It will all become very messy soon.
So you create a branch. When you are finished, or even if you just get stuck, you create a pull request, where you can tag someone to review your code and give feedback. At the same time your colleague does the same, but you never are in each others way.
What should be in a branch
It is best practice to limit a branch to contain one activity. So one bugfix or one feature. In my personal experience this can be very hard to keep track of, as you might notice a small bug if you are working on a feature that you want to change and it takes some discipline to create a new branch just for that bug fix. If you are working with others though, it is very important to be able to keep track of the history of the repository, as someone might want to see when a certain bug was fixed or a change was made. In your own personal repositories, it is up to you if you want to cheat a bit.
Working with branches
Enough theory, let’s start.
Create a new branch in Visual Studio Code
We start where we left off last time, with the example repository. The repository is cloned to a local computer. Let’s say we want to make a change to the script and we want to do that in a new branch.
Open up the script in Visual Studio Code.
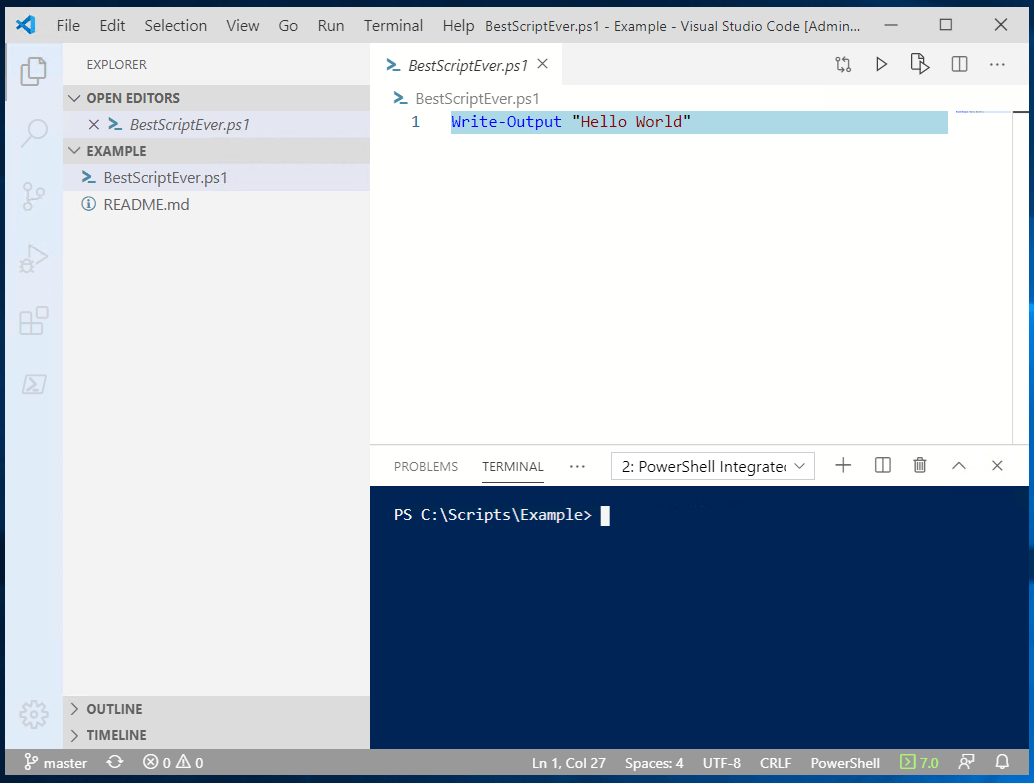
At the bottom left, you can see the branch we currently use, which is master. This is always the name of the branch if you have not created separate branches.
![]()
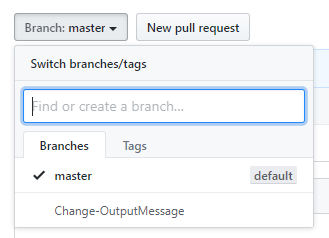
If you click on this text, you can see the branches that exist locally and the branches that exist in your repository. These are not always the same. For example, someone else might have created a branch on the repository that you have not used locally yet. Or you might have created a branch locally that you have not pushed to the repository yet. As you can see, the grey text defines if the branch is remote or local.
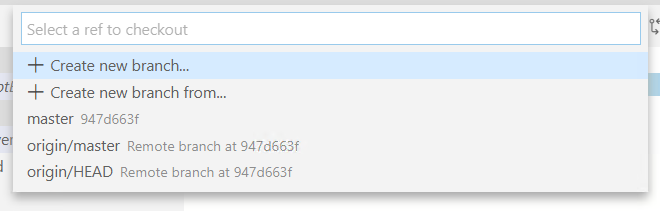
Select Create new branch.
You are asked to create a branch name. This could be pretty much everything, but I would recommend to give it a descriptive name to keep track of your changes.

So now in the bottom corner, it shows you are working on the branch you just created
![]()
Push the branch
After you make changes and save them, the source control icon on the left shows a 1 to tell you there is a change that can be committed. You can now create a commit message and commit the change. When you push the changes, a popup appears because the branch you are working with only exists locally. If you click ok, the branch will be published to the remote repository, so it is available there as well.
Open your repository in your browser and see what has changed.
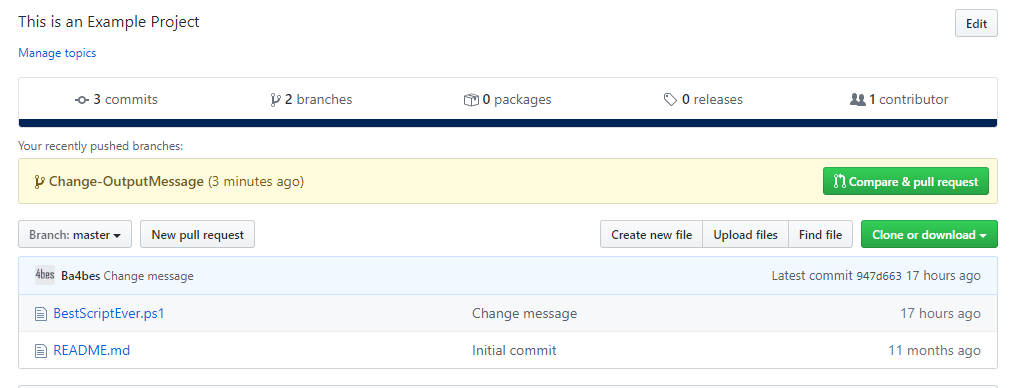
So the repository now shows there are two branches active. It also shows we have recently pushed a change to the branch we just created. The files you see are still the old versions in the master branch.
You can switch between the branches with the Branch: master button.
Your branch is now active, both locally and remote. You can keep working on the branch or start a new branch and work on that. In between you can switch as needed. When the code in a branch is ready, you can create a pull request.
Create a pull request
When you are ready, you can merge the new branch with the master branch (or any other branch, but let’s stick to master for simplicity). You can do this locally from the command line, or through the web interface in the browser. As I think the web interface can help a lot with understanding the process, we will use that.
You can start your pull request by selecting New pull request next to the branches button (see previous screenshot).
In the next window, you can compare two branches with each other by selecting them

The first branch is the one that will be kept, the second branch will be merged into it. When the compare branch is changed to the new branch, the following page comes up.
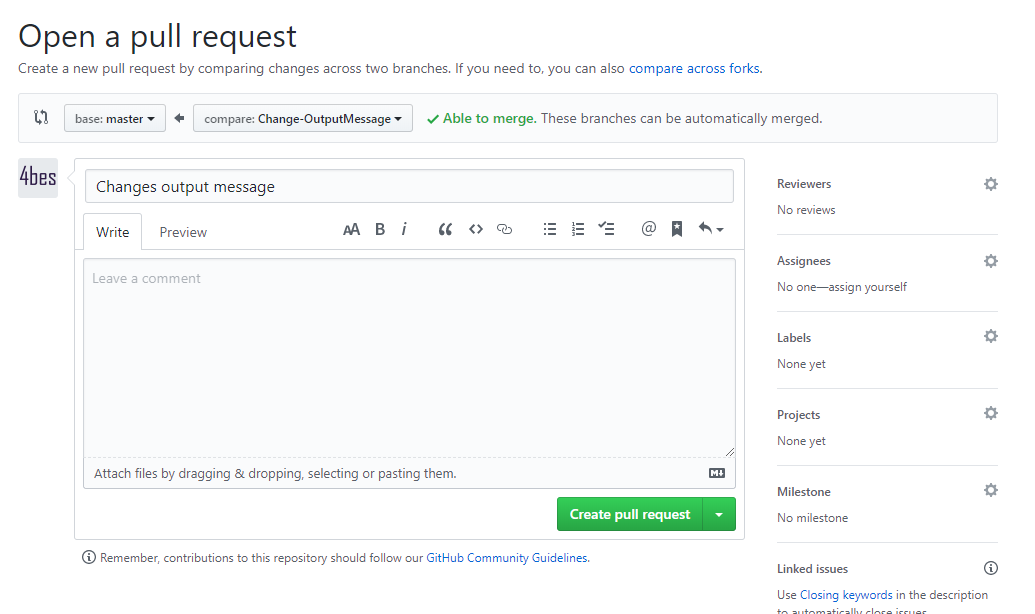
Here you can write a message to describe what the branch changes to the original code.
As you see you have a lot of options here:
- Choose reviewers that you would like to give feedback on your pull request
- Choose assignees that can keep track of your pull request
- Add labels or link projects or milestones, which can help in large project to keep track
- Add linked issues. If you are working with issues, this can become very handle for tracking the history of the repository. When someone views the issue, this pull request will be shown as the solution. The issue will be closed when the pull request is merged.
If you are working on your own stuff or in very small projects where you are in direct contact with reviewers, you can leave all these option empty. If you are working with issues though, it is a great idea to link them here.
View changes
If you scroll to the bottom, you can see the changes that would be merged to the master branch.

Here I can clearly see what would change if this pull request was completed.
Of course in this example there is not that much going on, but in production a lot more changes might go through. It is always a good idea to check if everything is still going the way you are expecting it.
When you have created a good name for the request and a message, you can click Create pull request.
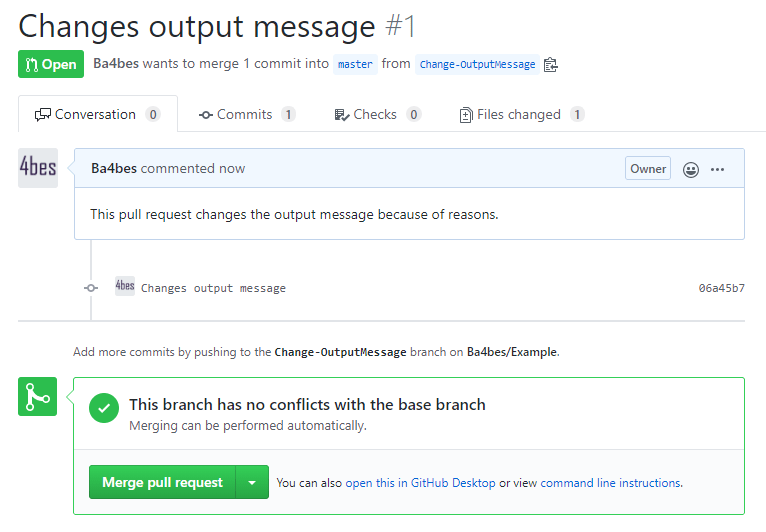
At this point, you get an overview of all your work. This page is accessible for everyone with access to the repository. This also means people can comment on your code, which can be really helpful in the review process. If someone suggests you change something, you can just commit that change to the branch, it will automatically be added to this pull request.
Handling merge conflicts
In the previous example, you saw the message that there were no conflicts and merging could be performed automatically.
It is possible to have merge conflicts though. This happens if the same line of code has changed in both branches and GIT isn’t sure which one to keep. If this happens, you have to manually select the “winning” code. If this is the case, you get the following message when you try to create the pull request.

As you can see, it will not allow you to merge. It does allow to create a pull request.
When you do, it shows the following message:
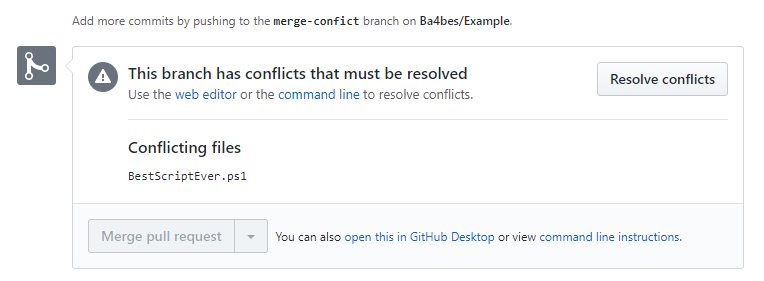
Here you can click Resolve conflicts
Note: In Azure DevOps, you do not have the option to do this in the web interface, you have to do it locally.
Find out how here.
The page now shows you the lines of code that are in conflict:
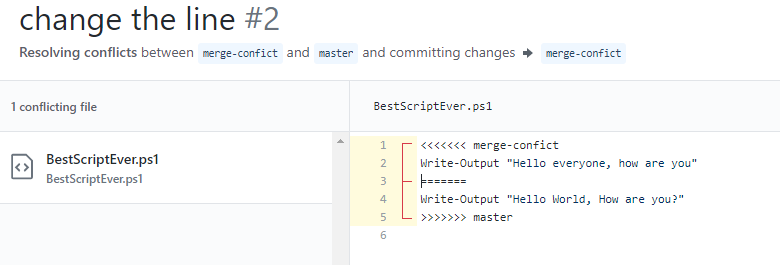
The first line is in the new branch, the second line is in the master branch. You can now manually delete everything except the Write-Output line you want to keep. So you also delete the line with
<<<<<<< merge-conflict
And the other lines that are there to show what is going on. Basically you want to be left with the script as you would want it to be after the conflict is solved.
After you are done, you click Mark as resolved at the right and then Commit merge.
Now you are able to proceed with your pull request as usual. The merge will be marked as a separate commit to this branch.
Complete the pull request
So if you have checked everything and have had your reviews, it’s time to complete the pull request.
Note: This assumes you have complete control over the repository. If you are creating a pull request for someone elses repository, only they can complete the pull request
There are different options on how you can merge. If you click the arrow next to Merge pull request you can see those options.
Note: In GitLab the option isn’t there, instead you have a tick box to squash the commits.
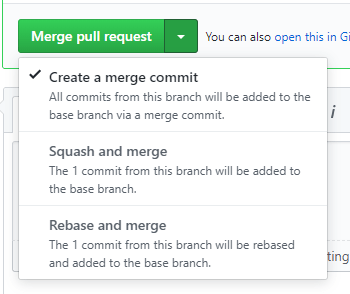
The short descriptions here tell you the difference between these options.
If you want to know more about this, you can read up about it here.
For this post, we will just use Merge pull request.
When you click Merge pull request, you are able to leave another comment. After that, you can confirm the merge.
As you can see in the gif, this is also the time where you get the option to delete your branch. It is always a good thing to do this, so your repository stays clean. Don’t forget that GIT stores your history, so there will not be anything lost if your remove the branch. If you don’t do it at this point, you can still do it later by clicking branches on the main repository page.
When you move back to the main page of the repository you can see your pull request as the last change.

Go back to master on your local repository
One thing that is important but easy to forget, it to switch your local repository back to the master branch.
You can switch the same way as you did when you created a new branch. Don’t forget to use git pull to get the new code locally as well
Conclusion and follow up
This is the tip of the iceberg on GIT for PowerShell: Branches and pull requests. There are a lot of things that you could consider when working with branches. I do think this is a good starting point and I recommend to start working with branches right away.
To move further, here are some links with guidelines and help to get a better understanding of what is going on.
- Overview of different strategies when it comes to branch structures
- The command line options for branches and pull requests
- Official documentation on the process of branching
- Contributing to public repository example: Microsoft docs
- Git Graph: a Visual studio code extension to help keep track locally


Hi,
Nice, but you had me stumped at this line:
“When you create a commit message and commit the change, a popup appears because the branch you are working with only exists locally.”
The popup doesn’t appear until I did a ‘push’, which is not in your text.
For the rest; I enjoyed myself going through this, now trying to apply in real life.
Thanks for posting this!
Hi Fred,
You are absolutely correct! I have changed it in the post. Thank you for mentioning it and commenting.
Regards,
Barbara