In my previous post, I explained how you can create a custom GitHub Action.
This week, I want to show how you can create an Azure DevOps task to use in a pipeline. These tasks are published as an extension and can be a bit challenging to create if you are not familiar with the process. That’s why I want to take you step by step to create a custom Azure DevOps pipeline task for PowerShell
Public or private
The first thing to consider, is what kind of distribution you want for your task.
By default, the published task will be completely invisible. You are able to share it with individual organizations manually. If you want to make your task public, you can publish it to the market place. There are some prerequisites to be verified for that, which you can find here.
For this post, we will focus on creating a private task.
The example task: a password generator
To show the process of creating a custom Azure DevOps pipeline task for PowerShell, I will use an example. This is the same example as is my previous post about a GitHub action.
This task will generate a password. It will either be a secure string or a plain text that can be used for example as a local password if you deploy a VM. Because this script is pretty generic, I hope the process shown can help you create your own task.
Create a repository
To create a task, first you need a place to store your code. I recommend to store this in a GIT repository. This repository can be stored in Azure DevOps, GitHub or with any other provider. The repository does not need to be publicly available, although the transparency of making the code available is often appreciated.
Create the repository and clone it to your local machine.
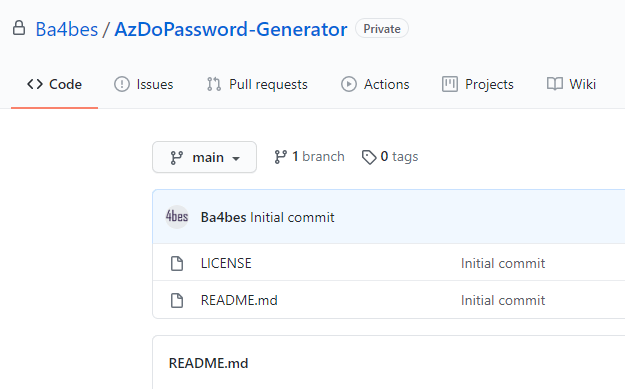
For my example, I made a repository called AzDoPassword-Generator in GitHub.
Install the tools
You need some tools on your workstation.
NodeJS
First, you need to install NodeJS. You can install it from here. This will also install NPM for you to work with. You can leave the default options in the wizard.
TFX
By installing TFX, you are able to create a package out of your files. Create it by using the following command in a PowerShell prompt
npm install -g tfx-cli
Visual Studio Code
We will work with Visual Studio Code. If you work with PowerShell in any way this tool is highly recommended
– Visual Studio Code
– The VSCode PowerShell Extension
Create the folder structure
You need a set of folders and files that form the base of the task. These can be created manually, or they can be generated through tfx. I use the last option as I think it gives a good base.
You can generate the files by using the following command (of course, you fill out your own values. But don’t worry too much as you can change them all later)
tfx build tasks create --task-name PasswordGenerator --friendly-name PasswordGenerator --description 'This task generates a complex password' --author 'Barbara Forbes'
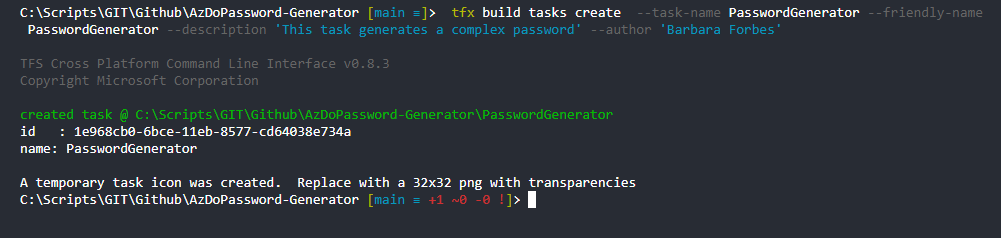
A file structure has been generated. Let’s walk through the files
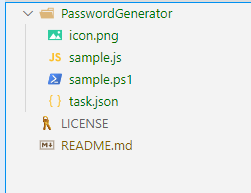
Icon.png
Your task has an icon that will be displayed in the marketplace and in the task assistant. As you can see in your output, you can replace the generated one with a 32×32 png. I use a simple file I made in Paint showing an asterisk.
![]()
Sample.js
This is a sample file if you want to use JavaScript. You can delete this file.
Sample.ps1
This is an example of a PowerShell script you could use in a pipeline. It is a good idea to look a bit at the cmdlets, to get a feel for how you can interact with the input from the pipeline. We will replace this with our script of choice later.
Task.json
This is the metadata of the task. In this file you find some information that we just filled in, as well as some examples of settings. We will change this to fit our script later.
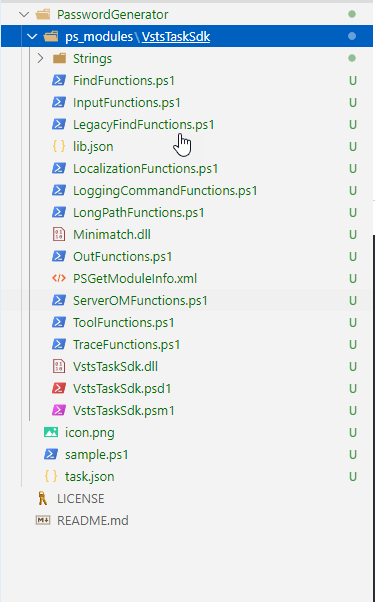
Add the VstsTaskSdk module
You need to add the vstsTaskSdk Module to your task. You will store that in a folder called ps_modules, which you place in the task-folder.
This is also the folder where you will store other modules your task might need.
To save the module to this folder, use the following cmdlet:
Save-Module –Name VstsTaskSdk –Path .\[taskname]\ps_modules –Force
So in my example, the cmdlet is
Save-Module –Name VstsTaskSdk –Path .\PasswordGenerator\ps_modules –Force
Now the module is available in the task folder. It is however in a subfolder that shows the version of the module. We need the files to be directly in the VstsTaskSdk folder. Copy the files that are in the 0.x folder and place them in the VstsTaskSdk folder. Remove the version named folder. The end result should look like this:
Create the PowerShell script
At this point, it is time to add the PowerShell script that will perform the actual task. The example script shows you some hints on the cmdlets you can use to catch input. I’m going to use the script I used last week, but change it up a bit so it works with the task. You can find the task version here. To have a consistent structure, I put this script in a new file called New-Password.ps1 and removed the sample.
Configure task.json
It is now time to shape task.json to fit the script. There are some properties we can change.
A lot of these options speak for themselves or you can leave at the default. The full syntax can be found on GitHub.
Let’s look through the properties we will change
Inputs
This is where we can define what parameters our script uses. In my script, I want to set 3 parameters: Length, isPlainText and ResultName. So I replace the input with the following:
{
“name“: “Length“,
“type“: “int“,
“label“: “Password Length“,
“required“: false,
“helpMarkDown“: “The length of the password“
},
{
“name“: “Resultname“,
“type“: “String“,
“label“: “Name of the result variable“,
“defaultValue“: “”,
“required“: true,
“helpMarkDown“: “The name of the output variable“
},
{
“name“: “isPlainText“,
“type“: “boolean“,
“label“: “output in plain text“,
“required“: false,
“helpMarkDown“: “Set to true to get an output in plain text“
}
These will probably be different for your task, but this is the syntax you want to use.
Execution
In Execution, you define what the task needs to do. The examples are already created to show the syntax. You can remove the part that starts the JavaScript script, as we deleted it. For the PowerShell script, we change the target to the name of the script file we used. In my case, it becomes the following:
“execution“: {
“PowerShell3“: {
“target“: “New-Password.ps1“
}
}
And we are done with task.json. You can find my result here looks like this.
Create a manifest file
To publish this task, we need one more file: vss-extension.json
The syntax of the file can be found here.
As you can see, there are a lot of options you can set. But the documentation is very well written and can help you out. And you do not need to set all options, your file can be a lot shorter. For my password generator, I created this file. As you see, it’s a lot shorter and a lot of the properties are self explanatory. Fill in your own vss-extension.json. Don’t worry about the property publisher yet, we will set it in the following step.
Versioning
Something that is important to keep track of, is the versioning. The version is defined in the task.json file and in the vss-extension.json file. They need to match and each time you want to update the package you need to update the version. To learn about how semantic versioning works, find an excellent guide here.
Create a publisher
To publish to the Marketplace, you need to create a publisher. This is a profile in the Marketplace where you will be able to manage your extensions. This page in the Microsoft Docs shows how to do this step by step. When you are done, you will have a publisher ID, which you can use as the Publisher in the file vss-extension.json.
Create a package
After you have updated the Publisher property, you are all set to create the package which you can upload to the marketplace. There is a oneliner you can use for it. Run this in the root folder:
tfx extension create --manifest-globs vss-extension.json

A new vsix-file has been created in the root folder. This is the file you can now deploy to the market place.
If you want to change anything in your task, you just change the versioning in both task.json and vss-extension.json. You can then run the command again to create a new package.
Publish the task
All set, let’s publish our custom Azure DevOps pipeline task for PowerShell to the market place, so we can make it available in our organizations.
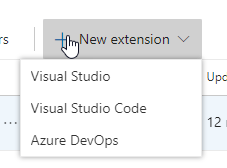
In your browser, open the Market place.
You should be logged in with the publisher profile you created before. In the menu, click New extension and select Azure DevOps.
You can now select the vsix-file you have just created and upload it. Don’t worry, it will not be available to anyone unless you share it.

When the upload is ready, your package will be verified. This should just take a few moments.

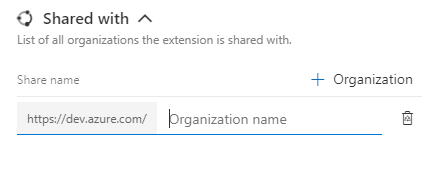
After your task is verified, you can click the three dots to open a menu. Here you can share your extension with Share/Unshare.
(notice how this is also where you can update the extension when you have developed a new version).

In the menu that opens you can add the names of the organizations you want to share the extensions with. As soon as you click somewhere else after typing, that organization will be able to install the task as an extension.
Install and use the extension.
Your task is now available to the organizations you defined in the previous step. You can find the extension link from the menu you saw before by selecting view Extension.
Login with an administrative account of the organization that you want to install the extension for (and that you have shared the extension with). Install the extension. The next time you want to work on a pipeline, the extension will be available in the assistant.

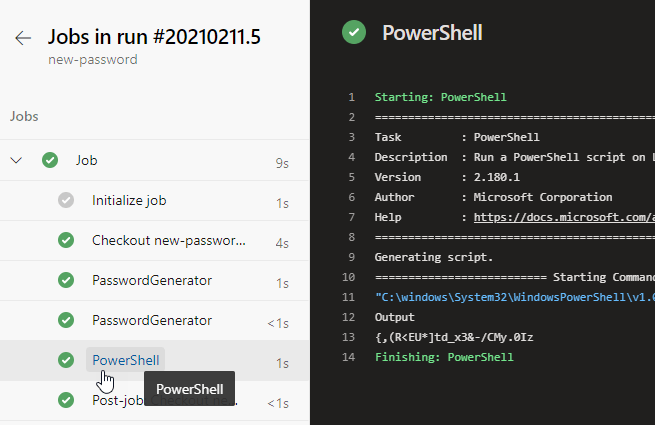
And you can use the functionality in a pipeline.
Conclusion
So that is how you create a custom Azure DevOps pipeline task for PowerShell. Don’t worry if you need a lot of versions to get the syntax completely correct, it takes some getting used to. If you want, you can play around with a task that you will never use in production to get a feeling of what the inputs and outputs should be. Have fun with it and enjoy it when you reach your goal!


Thanks for sharing this article. In the first few attempts, I got issues. After resolving those, finally, it’s working fine. Keep posting more like this content. I want to learn those new things and methods also.
Pingback:Top Stories from the Microsoft DevOps Community – 2021.03.05 - Microsoft Today
Pingback:Top Stories from the Microsoft DevOps Community – 2021.03.05 | Azure DevOps Blog
Pingback:Top Stories from the Microsoft DevOps Community – 2021.03.05 - Power Community
can we use Azure PowerShell?
Yes you can! You need to make use of a service connection to connect to the Azure tenant, like you would in the default Azure PowerShell task. The settings can be a bit tricky, you can look at the default Azure PowerShell task code for an example: https://github.com/microsoft/azure-pipelines-tasks/tree/master/Tasks/AzurePowerShellV5
Thanks for sharing.
Had some trouble to start but found what I needed.
“Save-Module –Name VstsTaskSdk –Path .\PasswordGenerator\ps_modules –Force”
After running this command, seems there is an XML file needed to build properly. I found it in your github repo.
Is there some way for that to be generated or is that an issue with the VstsTaskSdk?
Hi SenseiJoe,
Do you mean PSGetModuleInfo.xml? That should be generated by using Save-Module like you used.
I just ran it again to double check, there is no xml file saved.
There’s nothing named PSGetModuleInfo
Either way, since you had a copy I got things to run.
Again thanks for sharing, saved me a ton of time and made an impact on my pipelines already.
This is the simplest and easiest to follow example I have seen, it has saved me so much time, thank you!
Pingback:Powershell Azure Pipeline? The 13 Top Answers - Brandiscrafts.com
this is the old way to create extension, that work but i’m trying to figure out how to do the same with the new engine.
https://learn.microsoft.com/en-us/azure/devops/extend/develop/add-build-task